Author Archives: hifivoice

D800 Autofocus Target Quality

1. Introduction

At the dpreview forums there is a lot of handwaving about (the lack of) autofocus target quality. Without any evidence at hand, all kind of claims based on generic guidelines are generalised to whatever target is shown. 

There is an easy way to check the quality of an AF target: measuring. I’ve used Reikan’s Focal to check  autofocus consistency of various targets. Although there are certainly some deviations, the outcome is that most targets are sufficiently good for performing AF tests. 


2. Test Setup

The analysis of the targets is done with the focus consistency check of Reikan’s Focal software.The outcome of the analysis is a CoF value, determined by comparing (as a percentage) the average quality of all the results against the quality of the best individual shot. Reikan considers CoF values of 95% and above as adequate autofocus (more info can be found here). When I look with my own eyes to the results, CoF larger than 95% hardly gives visible unsharpness, between 92 and 95% gives acceptable but visible less sharp results, and smaller than 90% gives blurred results. 

The test set-up consists of a Nikon D800 with a 24-70/f.28 lens, used at 50mm@f2.8 at approx. 1.5m distance. The target is mounted flat and perpendicular to the camera. Light conditions are constant (cloudy day). I run a minimum of 10 samples per test, and I repeated the test 4x. I also changed distance, small shift of the target, or change the colour temperature of the light (cloudy, sunny, light bulb) to see if there is an impact to the quality of results. Small perturbations can be seen, but the order of magnitude of the outcome is always the same. Several targets have been used for the test. 

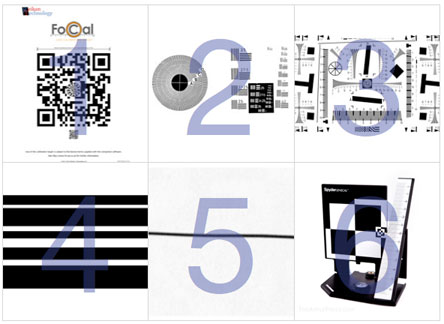
The first group of targets are dedicated targets for AF tests: 

  1. Reikan Focal. This is the target provided with Reikan’s Focal software package for doing multiple tests.  
  2. Leonard’s target. A target presented by Leonard Shepherd, claimed to be a good target for AF tests. 
  3. ISO/PIMA target. Used to test resolution of printers and scanners
  4. Thom Hogan. This consists of a collection of various lines, with different thickness (similar one here).  
  5. Single Line. A simple line drawn on a white piece of paper. Two exercises have been done, with the line positioned in the middle of the AF point, and one at 75% of the AF point, both showing exactly the same results. 
  6. Spyder Lenscal, a dedicated target for AF fine tuning. 

Target1

The second group of targets are targets from daily life:

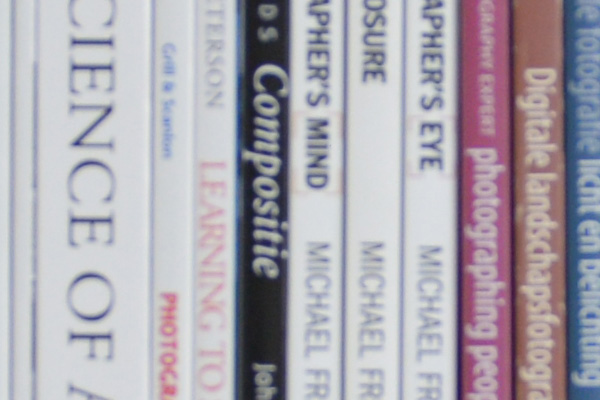
  1. Book shelf. Used to analyse left-field AF problems in the past. 
  2. Book spine. Showing contrasty white letters on a black background. 
  3. Beethoven. A picture of a composer on a flat surface. 
  4. Bobby. A teddy bear from London. 

Target2


3. Test Results

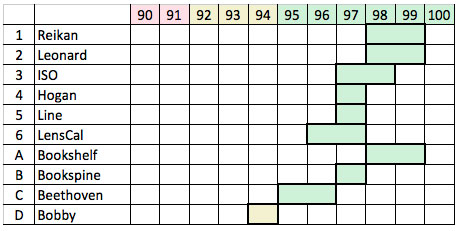
The outcome of the test is summarised in the following table, showing the range of CoF values over multiple tests: 

Table

As you can see, most targets show sufficiently good results to perform AF consistency tests. Some conclusions that can be drawn:

  • Reikan’s target, Leonard’s target and the bookshelf show equally good results. (1 + 2 + A). 
  • Although the other targets score a bit lower, the visual impact is hardly noticeable. In practice for visual inspection those targets perform equally well for AF tests. 
  • A single line works as good as multiple lines. (4 + 5). 
  • Real-life targets which are coloured and contain lots of small fine-grain details give less good results than dedicated black & white targets. Nevertheless, the differences are not huge, and still useable for AF qualification. In these cases, taking multiple pictures of those target is recommended. 

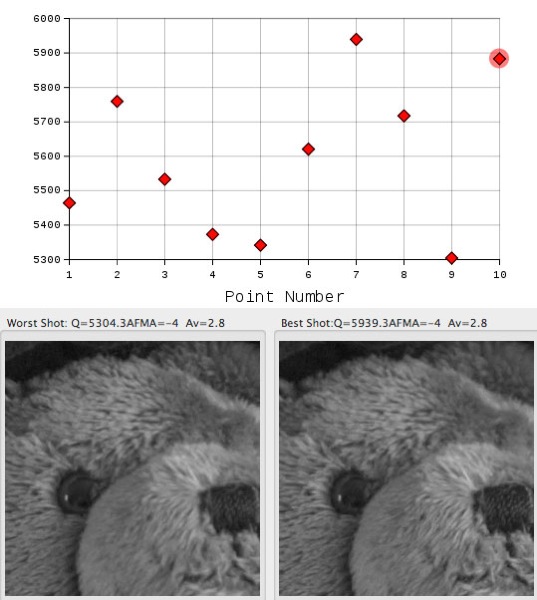
To get an idea of the best-case and worst-case results of Bobby, an impression is shown below. The differences are visible (less fine-grain detail at the nose), but please keep in mind we are pixel peeping at 36 Mpixels here. 

Bobby


4. Additional tests

Three additional tests have been done that are worth mentioning. 


1. Left – Middle – Right AF point Focus consistency

The bookshelf target was tested for AF consistency. The left AF point showed 0.5% better results, the right AF point 0.7% worse results over 3 tests each. This shows the results are sufficiently accurate. 

Bshelf


2. Sensitivity to fine-grain detail

With the 24-70 lens set at 24mm/f2.8, the Reikan target was tried at different distances. The differences are about 3% to 5%, where fine-grain detail gives less good results. 

Dis


3. Firmware 1.0.1 versus firmware 1.0.2

You can also notice some difference between firmware 1.0.1 and 1.0.2, and some improvements can be noticed in focus accuracy and quality of focus. The improvements are shown in the table below, where the Reikan, Hogan and especially the book spine targets show an improvement in AF consistency. 

Fw

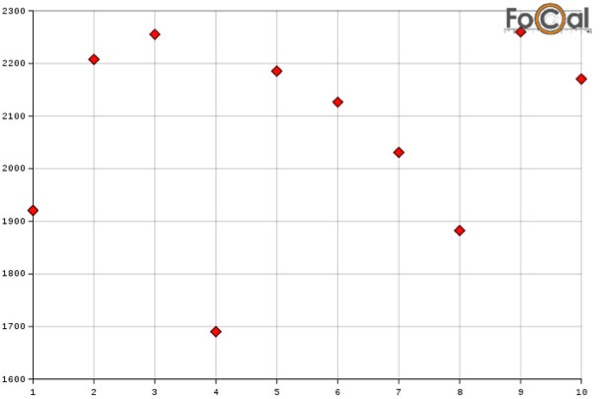
See the before and after results for the bookspine. 

– Before (91.9%) worst (1690) versus best (2255) focus result: 

Before

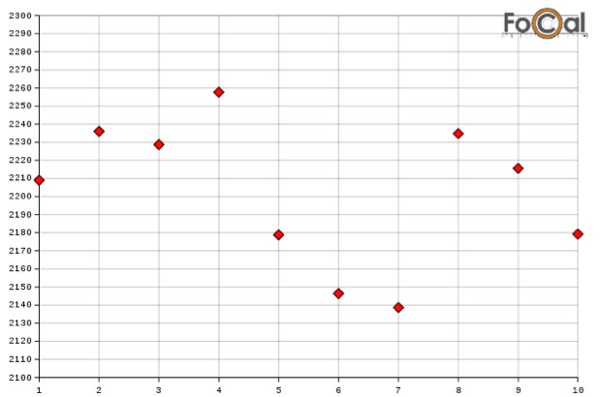
– After (97.6%) worst (2002) versus best (2256) focus result:

After


I’ve also performed some tests in moderate light, and it is obvious that AF quality becomes less (around 90% for targets that otherwise look fine). Hence, good light conditions are required to perform AF tests. 


4. Conclusion

The outcome of the test is as expected. All targets provide sufficient accuracy to perform repeatable autofocus focus test. 


Firmware 1.0.2 AF improvements

1. Introduction

Recently Nikon issued a new firmware release (1.0.2). In the list of changes improved subject tracking performance for AF-C is mentioned. On dpreview forums, several people mention also improved AF-S performance. As usual on those forums, such statements create a lot of fuzz because of claims made without any backup.  Time for a small experiment


2. Experiment

Reikan’s Focal Calibration Tool can be used to check focus consistency of a camera-lens combination. The tool allows to use any target at wish. WIth many targets (e.g. Reikan’s own target, Tom Hogan’s target, ISO target, a simple line etc.) the consistency of focus reaches figure that are > 96% using my D800 and 24-70@50mmf2.8. 

When I use a specific book as a target, the consistency drops to 92-93% (repeating tests). After performing a firmware update on the tripod, and under the exact same circumstances, the consistency increases to 97-98%. 

Typical results FW 1.0.1:

Fw101


Typical results FW 1.0.2 (scale is different):

Fw102


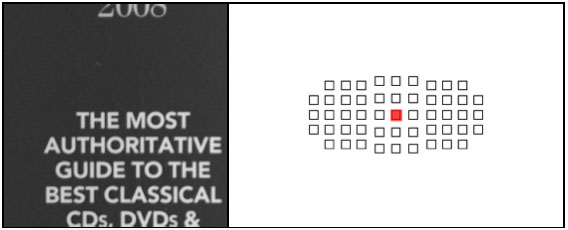
Impression of what the central AF point sees as a target:

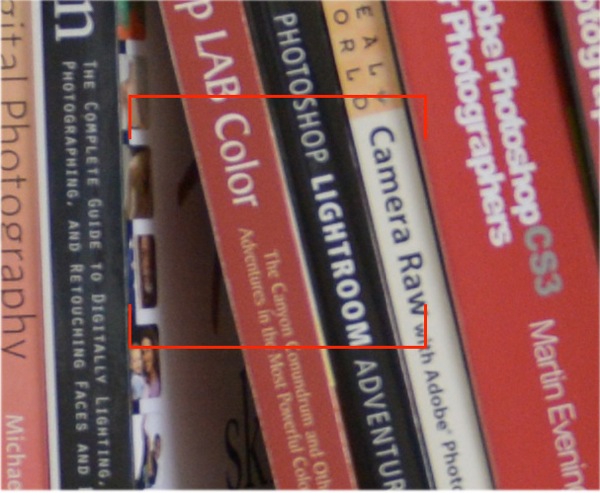
Target

This gives a very strong indication that AF-S consistency has been improved with this firmware update. Further tests will follow. 

D800 autofocus – the Grand Finale

1. Introduction

As clear from several internet forums, multiple people encounter autofocus problems with their Nikon D800 DSLR. The success rate of the repair seems to vary a lot, depending on the status of the camera, or the quality of the repair (centre) itself. In this post I will share my latest findings on the Nikon D800 calibration procedure applied at Nikon Service Point in the Netherlands (NSPtN), which manages to solve the autofocus problem completely!  


2. Analysis

Although an initial calibration of my D800 provided substantial better results, there was still something to be wished for (e.g. my 14-24mm lens required additional calibration). After some additional tests and contact with Evert van Stijn from the NSPtN, my camera got 2 more calibrations, with eventually very good results. The reason for posting these calibrations results are 2 new main observations:

  • Autofocus Distance Matters: Although the camera may autofocus correctly at close distance (say < 1m), it may not focus correctly at larger distances. This was not a standard check in the calibration procedure, explaining why I still did find some focus issues. 
  • Autofocus is not perfect: Although there are still some visible autofocus issues, these are not specific to the D800 and also visible on for instance the D700. 
These observations may help you in making your own analysis of your camera. 
 

3. Measurement Procedure

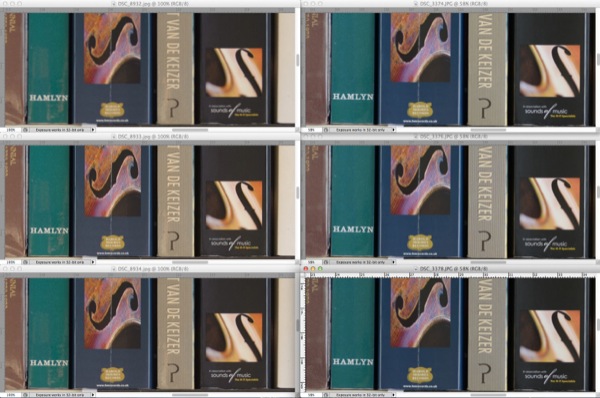
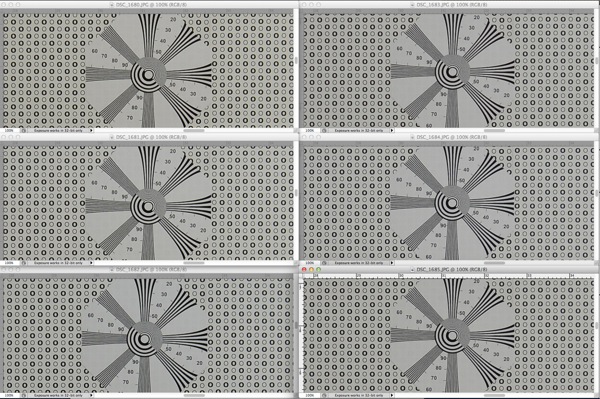
In a home situation it is difficult to build up a test setup that is perfectly calibrated. Setting up a camera on a tripod straight to a plain surface is not easy to accomplish. Also, some lenses slightly bend the surface because of field curvature effects, which become slightly visible at extreme focal points using very wide open apertures of some specific lenses. In such a case it makes sense to make relative comparisons. For a selected focus point, a first picture is made using live view, which provides a direct optical path to the sensor. Based on the same focus point, a second picture is made using mirror view. In an optimal case both these pictures should look the same for a lens that has been correctly AF fine-tuned (there are some differences in exposure). 

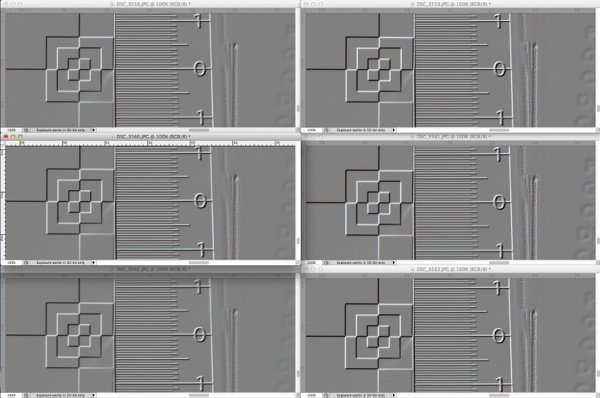
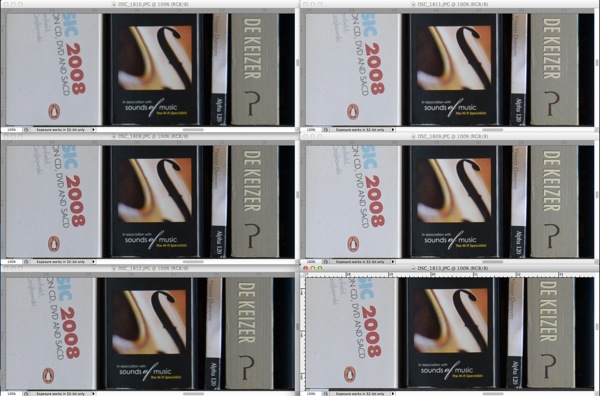
The following example shows my own test sets. The first test is a book shelf filled, providing a lot of contrasty details. If you are an autofocus neurotics, you can also glue special targets to the bookshelf (in practice I see that this doesn’t make a difference at all…). I’ve also positioned a LensCal element, to determine whether the camera front- or backfocuses. This situation is photographed at about 1 meter and 2 meters. 

Points

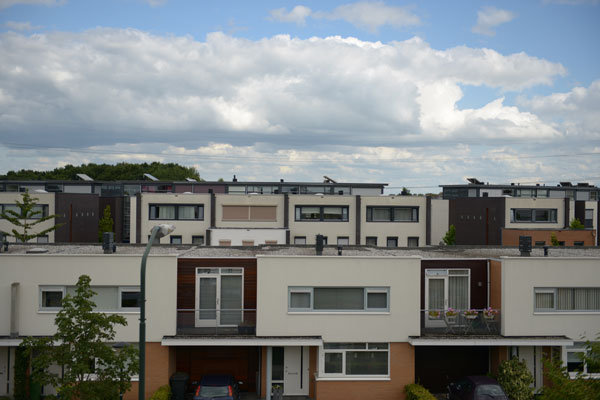
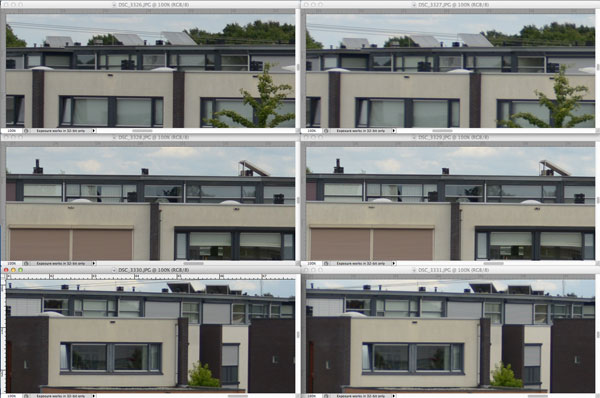
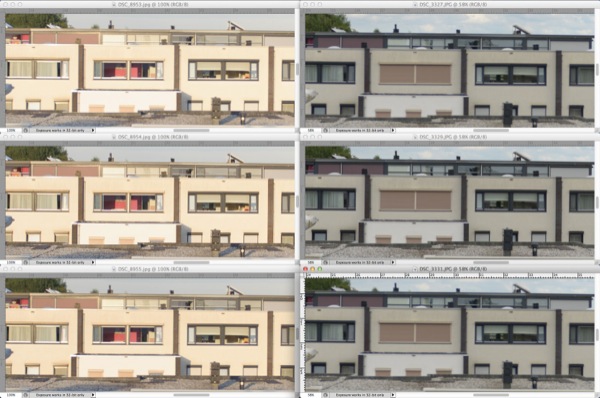
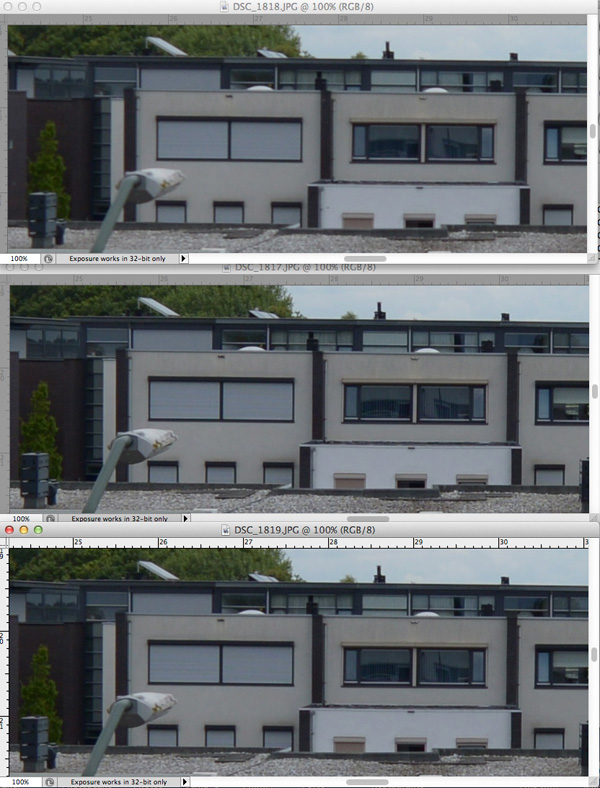
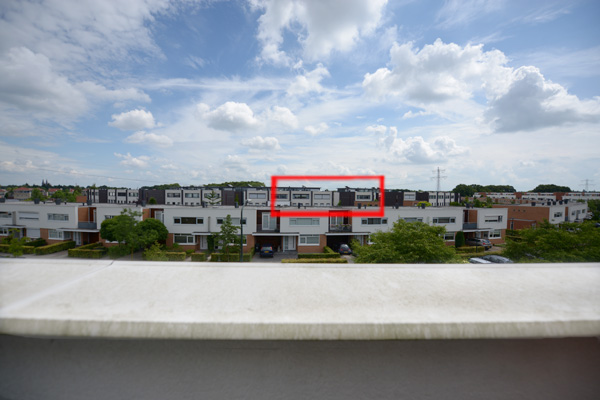
The second test is outside, photographing some houses. 

Houses

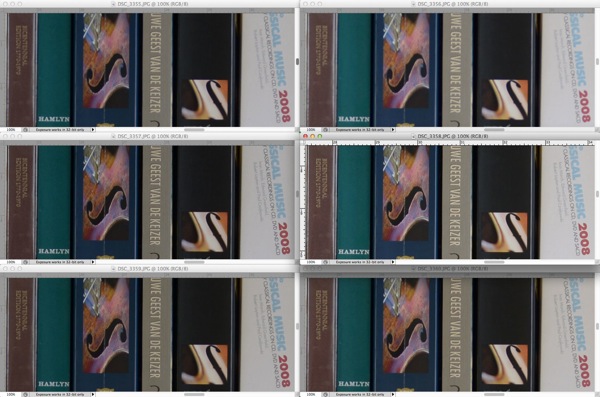
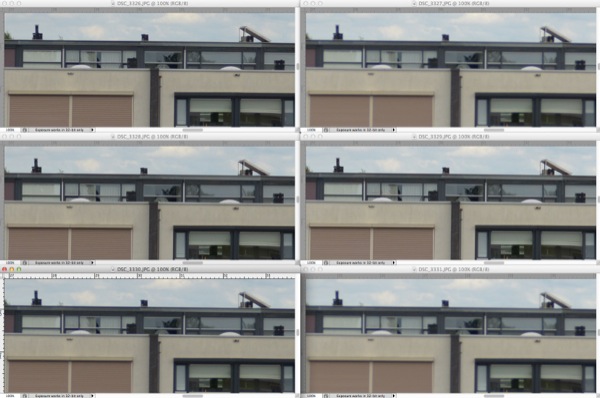
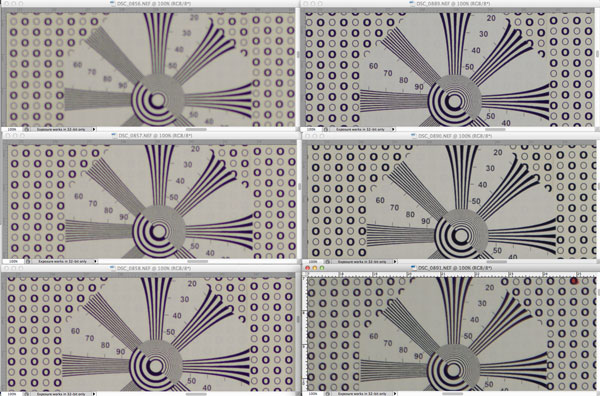
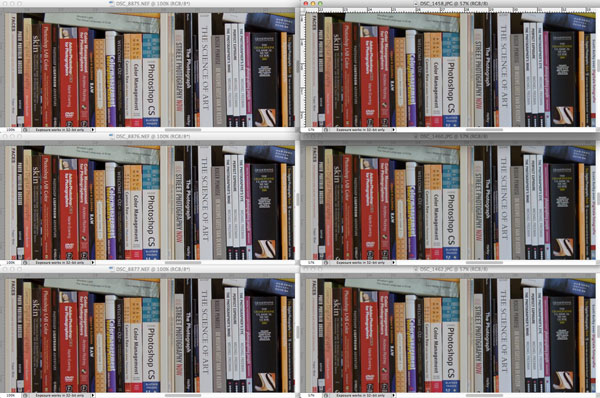
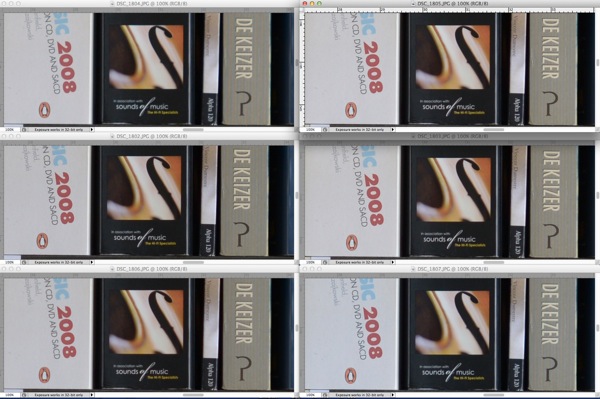
Subsequently, I’ve made overview pictures consisting of 6 crops at 100% magnification, where the comparisons should be made from left to right for relative comparison: 

Livemirror 

The result for a test at a distance of 1m for a 50mm/f1.4G lens at f2.8 looks as follows (click on the picture for a larger version): 

50 2 8 1m books

At the position of the lenscal (using image processing to emphasize the sharpness), where one can see everything is in perfect focus for all focus points: 

50 2 8 1m lin

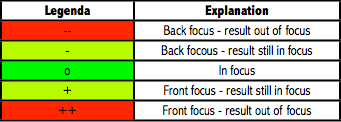
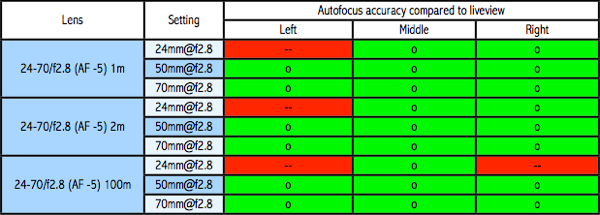
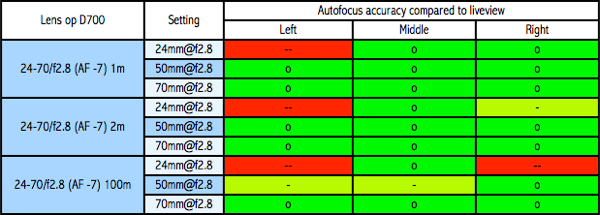
The result of the calibration of a camera and lens combination is expressed in tables. These tables show 3 tests, one where the distance between the object and the camera is about 1m, one where the distance is 2m, and one where the distance is “far away” (> 100m). In case of 1.4 lenses, I also perform the test at f2.8. The values in the cells of the table denote the amount of front or back focus. Severe front or back focus with visible sharpness effects is denoted with ++ or — and a red colour. Front or back focus with no visible effects is denoted with one + or -. 

NewImage


4. Results

The 14-24/2.8G, shows overall good results:

NewImage

The 24-70/2.8G still has the tendency to strongly back focus at the left side when using it at its wide angle range (24-35mm). It also back focuses at the right side with large distances. As will be shown later, this behaviour is also visible with the D700.  

NewImage

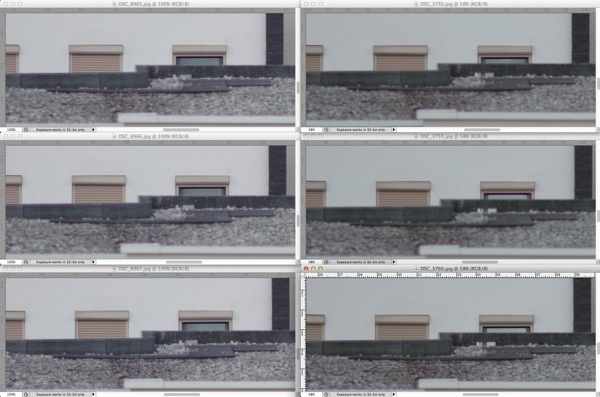
To get an idea of the effect, the following two crops show the results for 24mm@2m and 24mm@100m (click on the picture for a larger version):

 24 70 24 2 8 2m books

24 70 24 2 8 ver

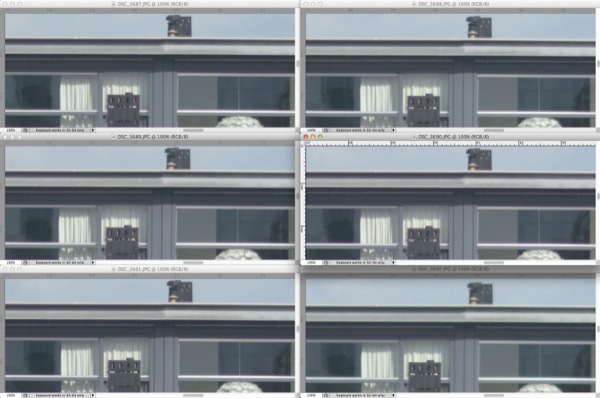
The following crop shows live view versus mirror view underneath the selected focus points, where the difference in sharpness is less prominent, but still visible.  

24fp600

The following crops shows how autofocus results changes from left-to-right:

24 70 24 2 8 ver L2R

The good news is that the sharpness underneath the focus point itself is OK-ish for short distances (but still very different from the live view situation in the overall picture). Luckily, my practical use-cases hardly will give me the above situations:

  • Most of the times I use the centre focus point, and re-focus
  • I use the left-right focus points only at short distances, and the sharpness underneath the focus point is quite OK in those cases
  • For far distances I hardly use the left-right focus points, and mostly apertures > f5.6

So in practice I assume this setup will work fine for me.  

The 50mm/1.4G shows overall good results:

NewImage 

I’ve also test my 60mm/2.8G macro lens, which is extremely sharp all over:

NewImage

The 70-200mm/2.8G also gives good results:

NewImage

Finally, my (favourite!) 85mm/1.4G lens has a strange front focus effect at the right-most point. This is restricted to two auto focus points, the right-most, and the one above that, all the other points are razor sharp. The D700 shows exactly the same effect, which is kind of weird. 

NewImage 

Using the 85mm at such a wide open aperture for long distances at the right focus point is a very strange case, so I’m fine with the above results, and consider the lens – camera combination to be fine. For an impression of the effect, see the picture below (click for a larger version).  

85 1 4 ver

To get an idea of the differences between the various calibrations, I’ve constructed the following table (click for a larger version). The first tests I’ve only photographed at one distance (between 1 to 1.5 meter), therefore the table only shows the common case. In general you can assume the results would have been worse for larger distances, so I would expect the table to be filled with more red boxes if those cases would have been included as well . As is clear from the table, the last repair shows significant better results. 

R overview 600


5. Comparison with Nikon D700

As is obvious from the tables, the results are not perfect in all cases. For instance the 24-70mm lens has issues at 24mm. The “good news” for the D800 is that my D700 shows even worse results for these cases. This means that the focus errors are not specific to the D800, which implies that the D800 can be considered to be fixed in my opinion. 

The picture below shows the mirror view results of the D700 on the left side, and the mirror view results of the D800 on the right side. I’ve scaled the D800 pictures to roughly the D700 resolution. 

24-70/f2.8 @ 24mm – f2.8 -1m

D700 D800 24 70 24 2 8 1m books

24-70/f2.8 @ 24mm-f2.8 -100m

D700 D800 24 70 24 2 8 ver

85/f1.4G @ f1.4 – 100m 

D700 D800 85 1 4 ver

The D700 results are as follows, and as you can see it is even worse than the D800:

NewImage


6. Conclusions

Although mirror-based autofocus is still not perfect, I consider my D800 to be fully fixed. All ‘n’ all I’m very satisfied about the current status of my D800 now, and if I had to grade it, it would get a 9.9 out of 10! 

Special thanks goes to Evert van Stijn from Nikon Service Point in the Netherlands. His intrinsic interest in finding the root cause of the problem, the time he spend with me on the phone and in the lab shows that he wants to improve the calibration procedure to be able to provide a better service to all of us. It is people like him that eventually create satisfied customers. 

There is a critical word to be said about Nikon Japan, who seem to think Silence is Golden. If the problem is small, it is a small gesture to take back the problematic cameras, and replace them instantly. If the problem is big, I expect a better roll-out to the service centres, and more clear guidelines to the user community. No information at all creates a lot of fuzz and emotions in the forums and blogs. 

Finally, I wish anybody who is affected by the same issues good luck with resolving it with their local service centres. I hope the info on my blog helps to get your case forward. Happy shooting! 

Protected: Overzicht2

This content is password protected. To view it please enter your password below:

Protected: Overzicht

This content is password protected. To view it please enter your password below:

Final observations on D800 AF repair

1. Introduction

After the repair of my D800 autofocus, it turned out that my 14-24mm/f2.8 lens was still not working correctly. The lens was giving good results at 24mm, but at 14mm it was only sharp using the left AF field. When calling the Nikon Service Point in the Netherlands, they advised me to bring my camera and lens for repair. Nikon has the possibility to AF fine-tune the lens relatively shifting the 14mm focus to the 24mm. They also asked me to bring my 24-70mm, as it is known for the similar problems.  

2. Results after repair

My 24-70mm/f2.8 was considered to be an extremely good copy, and hence was not touched. The 14-24mm/f2.8 was investigated, and indeed some issues were found. It was corrected for front focus at 14mm. The technician did not completely optimize it for near-by focus, as otherwise the lens wouldn’t focus correctly for infinity anymore. So trade-off performance is to be expected. On the test card of NSP the focal results look good after the repair (click on the picture for an enlargement, all are 100% crops): 

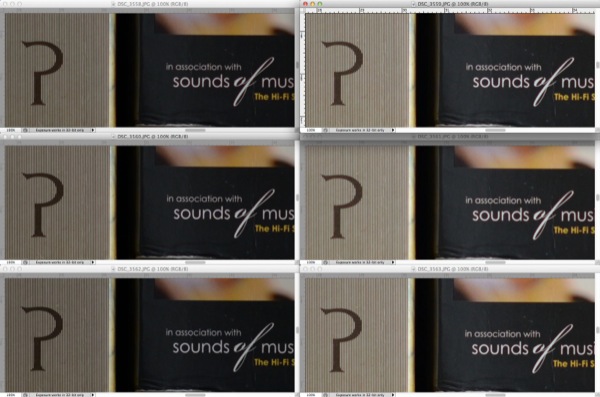
left side 14mm/f2.8, right side 24mm/f2.8, left, middle and right AF fields from top-to-bottom (AF-fine tune +5): 

14 24 after

Hence, all looks OK! Checking the AF results with my book shelf also shows good results (left side life view, right side viewfinder), with some minor deviations, but this is within expected tolerances of AF accuracy and put correctly on the optical axis. 

24mm/f2.8 (AF-fine tune +5): 

14 24 at 14 2nd

14mm/f2.8 (AF-fine tune +5):  

14 24 at 14 2nd

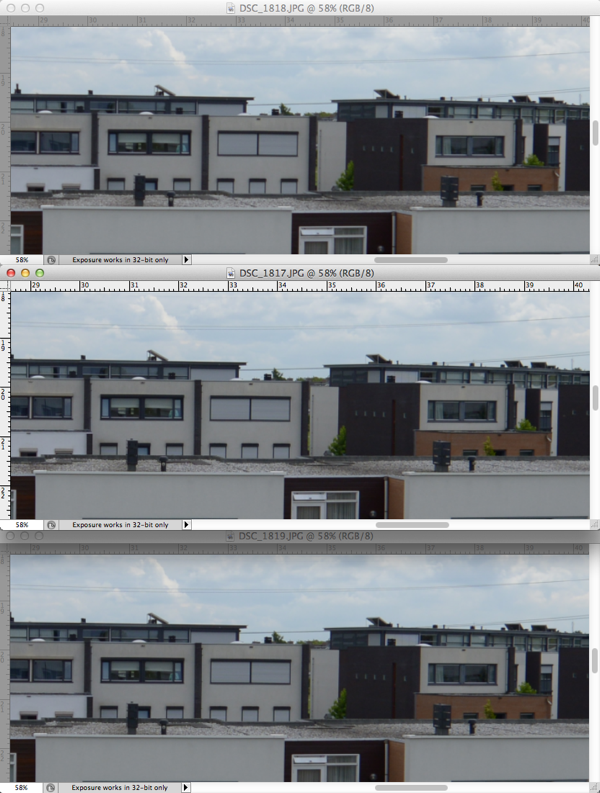
I’ve also checked the lens for AF at infinity. At 24mm the results are good, at 14mm these is a slight tendency to unsharpness when using  the left AF field. See underneath the difference for left, middle and right AF fields. For live view all AF fields are sharp, hence this shows there is still some offset w.r.t. mirror-based autofocus. 

14mm inf 600

When scaling down to D700 resolution, the differences are less noticeable:  

Screen Shot 2012 07 15 at 1 41 07 PM  

Please be aware this is pixel peeping, the overall picture is shown below:

DSC 1818

3. Overall conclusion

From a technical point of view the (repaired) D800 is still subject to asymmetrical AF variations (and maybe the ones that are reported to be without any problems may have some issues in these type of cases as well). Most autofocus use-cases do work correctly for me, with the exception of 14mm at infinity with left-field AF at significant magnification. This is a use-case I hardly use, so I’m fine with the current situation. 

Overall I’m satisfied with the current status of my D800, it allows me to take beautiful pictures with a lot of detail and headroom for post processing. Nevertheless, I don’t understand why Nikon is not capable of producing a 36 MPIx camera of €3000 with an AF mechanism that is not as precise as the one in the D700. For that reason, on a scale of 10, I will give my D800 a score of 8 to 8.5 instead of a 9.5 to 10. 

As for the repair, I’m very happy with the service provided, it is clear that the service centre has done everything that is possible. The fact that they’ve also serviced my 14-24 lens (and asking for the 24-70) gives them a 10 out of 10. 

This will be my last report on AF-testing (unless something significantly new pops up). I hope my writings gave some useful background info to you, and encourages people to send their camera (and lenses) for service, or give people the confidence to not hesitate to buy a D800 despite all the negative emotions out there. 

D800 autofocus repair overview

1. Introduction

On the web there is quite some confusion now about the kind of repairs that are offered to repair the D800 auto focus issues by the different Nikon Service Centers. 

My previous repair resulted in my 14-24/28 lens to show some unsharpness at 14mm, so I made an appointment last Thursday to have that fixed. After the check up of my 24-70 (extremely good) and my 14-24 (some adjustment), I was offered a tour through the Dutch Service Center with some explanation of the way autofocus is handled by them. Please be aware I’m not an expert in optical physics, so what follows is a summary of what I understood.

2. Repair overview

The repair procedure has been developed by Evert van Stijn, a technician at the Nikon Service Points in the Netherlands. He has invented this procedure in the past, for a Nikon D2(x or h), that did show AF problems as well. The repair consist of several stages:

  1. Align the sensor and bayonet
  2. Determine and set the distance of the sensor to the bayonet
  3. Adjust the angle and of the first and second mirror
  4. Straighten the AF CAM module
  5. Determine the relative displacement of the AF points by software
  6. AF-fine tune lenses
  7. Final checks

2.1 Align sensor and bayonet

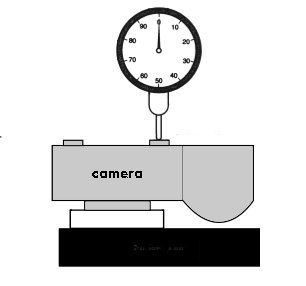
In the days of 35mm film, the bayonet and the film could easily be aligned by using a dial indicator. The camera is laid down on its bayonet,  the backdoor is opened, and the film holder is measured at several places to see if it has the same distance.  To measure the sensor tilt in a digital camera, it needs to be dismantled. This gives access to some reference points on the sensor PCB, so that the relative sensor distance can be measured. 

Dial

To be able to measure the sensor alignment to the bayonet without opening the camera, or to determine whether an AF focus module is tilted, a big setup has been made with a tightly fixed and calibrated lens that points towards a scene with 4 bended scales in the corners. By attaching a camera to this lens, one can see from the 4 bended scales whether the bayonet and sensor/AF module are misaligned. 

2.2  Determine and set the distance of the sensor to the bayonet

In case the sensor and bayonet are straight, the exact distance may still be a bit off. To be able to determine the exact distance, a manual focus lens, calibrated to the distance is being used. The lens was attached to a large tube with a kind of microscopic viewfinder (I think it is a collimator), where you could see green chroma, magenta chroma or no chroma at all when turning the focus ring. This principle can be used to determine the pixel sharpness on the sensor. 

2.3 Adjust the angle of the first and second mirror

By using a laser-based mirror angle-inspection tool (developed by a service centre in Germany, and refined and issued to all service centers by Nikon), the primary mirror can be checked for right-left and up-down deviations and put under and angle of exactly 45 degrees. Secondly, the secondary mirror can be adjusted to 54 degrees, by checking for up-down deviations. (picture from the web, click on picture to see the source)

2.4 Straighten the AF CAM module

The AF CAM module can also be aligned, with screws and washers. I do not have much details on this specific phase.  

2.5 Determine the relative displacement of the AF points by software

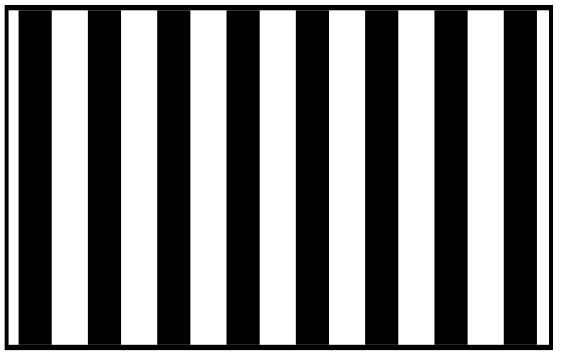
The camera is attached to a computer, and directed towards an illumination box at 1m distance holding a card with vertical lines. A computer program determines the autofocus offset per AF field, and puts these offsets in a flash/EEPROM memory as compensation values. 

UPDATE: The software consists of 3 stages: (1) it checks for dust on the AF sensor, (2) it determines the offset per AF-field and stores this in the memory, (3) it re-checks the new values by doing a measurements again. I’ve learned that the software only checks the AF module. During this test NO photos are being taken, so only the AF sensor is checked for asymmetric behavior, and no check is done with its relative behavior towards the sensor. This explains why next to this software step AF-fine tuning may still be required after the repair (unless this is compensated by the repair as well)! 

UPDATE 2: A reference D800 camera (sent by Nikon) is used to analyse the software test setup that is used to re-program the AF field offsets. This reference camera is used to determine the measured values for all the AF points for the specific test setup of the service centre, and these values are stored in the software. So it essentially calibrates the test-setup. Subsequently, a victim camera goes through the test, the measured values are compared to the values measured by the reference camera, and adapted accordingly.  

UPDATE 3: In some cases, additional offsets will be applied to the software calibration setup, effectively pushing the outer AF fields even more towards a certain direction. The test setup to perform the software calibration is carried out with a 50mm/1.4D lens (@f2.2) at a distance of 1m to the test card, a situation where not all  deltas may be discovered at a sufficient resolution to determine the right compensation values. This means that with certain lenses, and especially at larger distances, focus issues may still be present inside the camera. The additional offset of focus points is performed by means of editing the offsets in a reference data file created by the reference camera. NSP has created multiple versions, from moderate to aggressive. Depending on the  calibration results (that need to be checked by hand), they choose a certain hand-made setting and re-calibrate again, until satisfactory results have been accomplished.  

Screen Shot 2012 07 14 at 9 46 05 PM

2.6 AF fine-tune setting (optional)

A slant-chart is used to determine the AF-fine tune setting per lens (UPDATE: this is not a standard part of the repair procedure; only when a camera-lens combination needs to be checked, normally done by the consumer himself). The default lens for Nikon is the 50mm/1.4D, at a f2.2 setting. (picture from the web, click on picture to see the source)


2.7 Final Checks

An autofocus reference card is used to check and judge the overall result. 


3. Other type of repairs

On the forums, and on Ming’s blog or Mansurovs’s blog repairs are mentioned without mechanical adjustments. These repairs do mention the use of a laser and jig, so we suspect that only stage 3 (mirror alignment) and stage 5 (software calibration) are carried out in those cases.

4. Conclusions

As can be seen, the repair consists of a mechanical part, and a software part. The mechanical part first makes sure the sensor and bayonet are well aligned, the mirror is well aligned, and then the software kicks in to register the relative differences that are still left. 

D800 autofocus after repair

1. Introduction

My previous blog post showed an analysis of the left field AF problems of my Nikon D800. Last week I managed to ship the camera to the Nikon Service Point in the Netherlands for re-calibration. I did send it on Monday, and I got it back on Friday, effectively 4 days. 

This blog post shows the results of the calibration, and a summary of the extensive phone discussion I’ve had with the engineer that did repair my camera. 


2. Nikon Service Point – before and after calibration

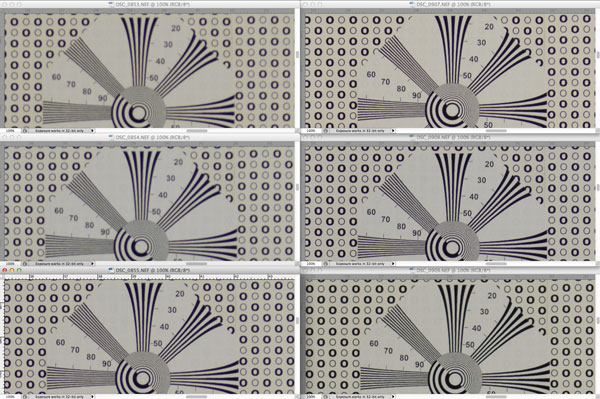
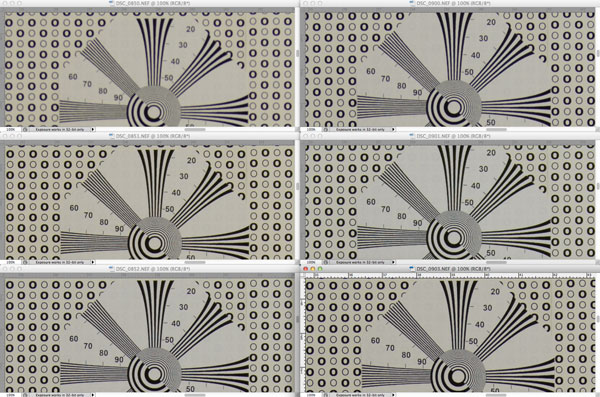
The calibration procedure is normally performed with a dedicated calibrated 50mm/f1.4D lens (at f2.2). The engineer also used a 24-70mm/f2.8 and 24mm/f.14 lens, as the problem is (reported to be) more explicit with those lenses. The test card being used is shown below, it is always photographed from the same camera position, where only the AF points are changed: 

DSC 0890

The underlying crops show the difference before and after repair (you can click on the picture for a full-sized version). The left side of the picture show the situation before calibration (from top to bottom it shows the star just above the middle based on using the left, middle and right AF point). The right side shows the accompanying situation after calibration. 


50mm/1.4D @ f2.2

50mm 600


24-70/f2.8G @ 50mm/f2.8

24 70 50mm 600


24-70/f2.8G @ 24mm/f2.8

24 70 24mm 600


As you can see, the results show a significant improvement after calibration. Nevertheless, there are still visible sharpness differences. Look at for instance in the 50mm/f1.4 picture; the right-most AF point still shows some unsharpness compared to the left-most and middle AF-point. For the 24-70/f2.8G @ 24mm the results look close to perfect. 


3. Nikon Service Point – discussion

Directly after the repair on Thursday, I was contacted by the engineer who took care of my camera. We did have 20 minute chat, discussing the nature and expectations of the repair. He did read my blog and some forum posts. He was certainly interesed in informing the community about the backgrounds of the re-calibration procedure, so he agreed (and kind of hinted) to share his info. He also provided example pictures of his calibration efforts on the flash card, that I could use for that purpose. 

Nikon Service Point in the Netherlands was the first service centre being be able to successfully repair the AF problems by re-calibrating the AF fields separately. This re-calibration repair has been invented by them by means of a special constructed hardware setup. It is now deployed by Nikon to service centers world-wide. 

Nikon does not inform the service centers about the root cause for the AF problem!!! The engineer assumes it is some combination of the lens, the focal length, the aperture, the subject distance, the mount, the mirror and the AF-unit, and small fabrication deviations on any of these components that add up to a malfunctioning AF-system. The reason why only one side of the focus field is affected is therefore not understood. 

The engineer warned about the effectiveness of the repair. I shouldn’t expect optimal results for all possible lenses and their use-cases. Some of the reasons are: 

– Focus shift; you can only optimize the AF for a lens for one specific aperture value for a lens. 

– Focus deviation; for zoom lenses the optimal focus distance differs for different focal lengths (e.g., a 24-70/2.8 which is normally calibrated and AF-fine tuned at 70mm, but then has the tendency to front-focus at 24mm, so the results at 24mm are generally less good). 

– Live view is always intrinsically better than mirror-based focus. “Many people seem to understand and accept that live view has a better performance than mirror-based autofocus, but they have problems to accept that mirror-based autofocus is worse than live view”. 

He agreed that my camera definitely had an AF problem. He considered mine to be “moderately affected”, and has seen cameras that were much worse. He talked about a couple of cameras already served by him. Hence, the AF problem is a common problem! He also mentioned people sending in cameras that did not have a problem at all, with no example pictures whatsoever. Obviously, there are also plenty of proper working cameras out there!  

When I asked about the expected improvements, he stated that the results would be unpredictable, and I did have to check for myself. I was  advised to first AF-fine tune all my lenses again (most didn’t need any fine-tuning for the middle focus point), because the focus may have shifted due to the re-calibration.  

When I asked whether my 85mm lens (working perfectly before) would be negatively affected after this repair, his answer was “probably yes, it will be worse”. This concerned me a bit (I’m more into >= 50mm photography), so that’s why I’ve fine-tuned and tested (almost) all of my lenses again. The results of that are shown in the next chapter. 


4. My own test

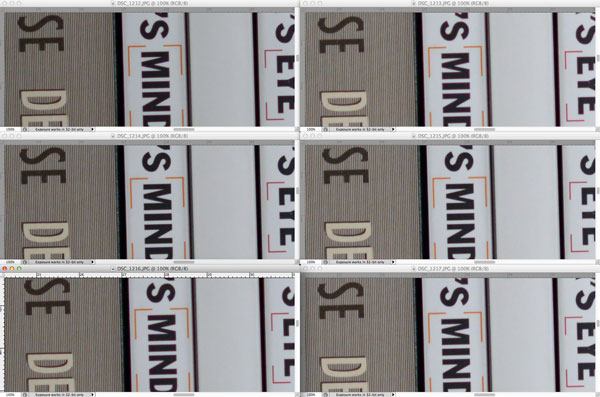
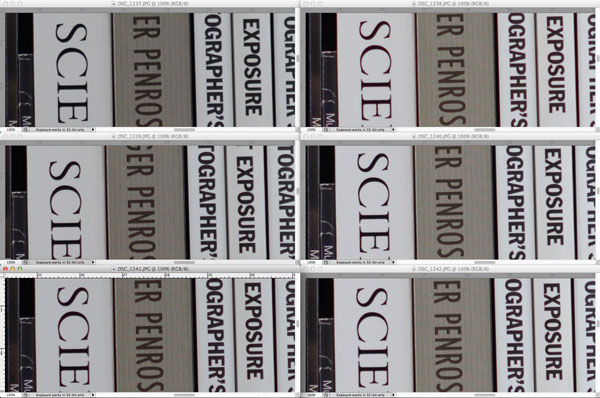
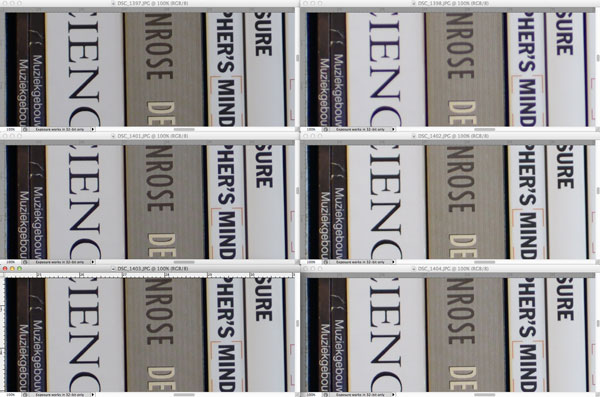
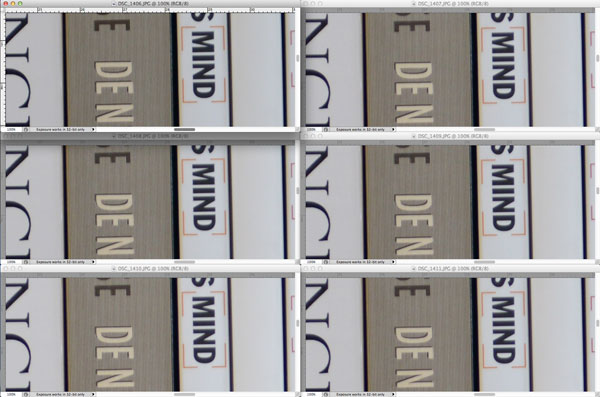
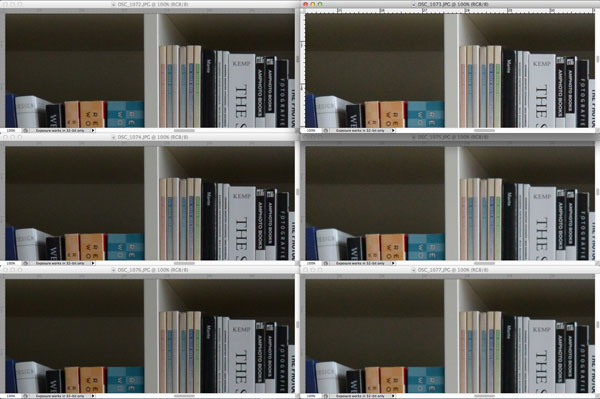
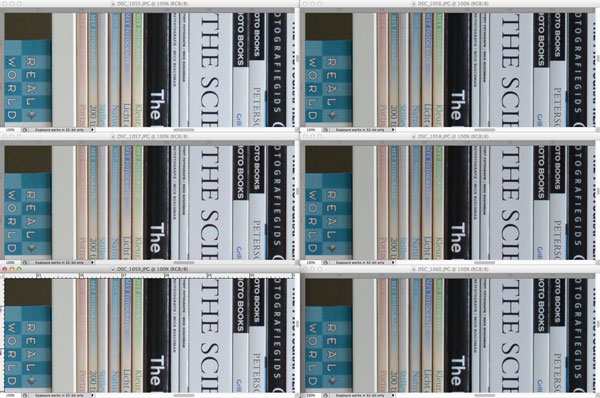
Back to the bookshelf again. After AF fine-tuning my lenses, I’ve checked the sharpness for the left, middle and right AF points using live view and viewfinder based focus. The underlying crops now show the results for live view on the left, and mirror-based autofocus results on the right. Again, the left-most focus point is on the top, the right-most focus point is on the bottom. Although you’ll find some compression artifacts because of the jpg translation, the quality is sufficient for relative comparison. 


85mm/1.4G, f2.2, AF-fine tune +5: looks perfectly fine, with some minor variations on the right-most AF point. 

85mm LMR5 600p


50mm/1.4G f2.2, AF-fine tune -5: looks perfectly fine, with some minor variations on the right-most AF point

50mm mh 600


24-70mm/f2.8 @ 24mm/f2.8, AF-fine tune +5: very little unsharpness left, a bit more unsharpness right. Overall pretty good. 

 24mm LMR +5 600


24-70mm/f2.8 @ 50mm/f2.8, AF-fine tune +5: not fully sharp at the left AF point

50mm LMR +5 600 


24-70mm/f2.8 @ 70mm/f2.8, AF-fine tune +5: a bit on the soft side everywhere, which is a property of the 70mm@2.8, less sharp at the right AF point.

70mm LMR +5 600


14-24mm/f2.8 @ 14mm/f2.8, AF-fine tune 0: suffers from front-focus at 14mm, and less sharpness at mid and right. 

14mm mh 600


14-24mm/f2.8 @ 24mm/f2.8, AF-fine tune 0: good sharpness overall. 

24mm mh 600

Overall the sharpness is not 100% accurate in all cases as predicted by the engineer at Nikon Service Point. There is however a significant improvement of the camera before it was repaired. I would call the repair an 85% success, much better, but not “perfect”. 


5. Comparison with my D700

Many people claim that the D800 resolution is the cause for the sharpness issues. Comparison shows this is certainly not the case. I’ve performed similar tests on the D700, and for comparison I’ve scaled down the D800 images to D700 resolution, The following pictures shows crops from the D700 on the left side, and the D800 on the right side. As can be seen, the D700 shows consistent sharpness overall, the D800 does not. 

D700 vs D800 600

This makes the idea of re-calibrating the 14-24 lens a bit suspicious, as how would it react on my D700 after repair? I’ll ask for advice at the NSP before drawing any conclusions. 


7. Conclusions

The repair significantly improves the AF performance of the D800, and I can advice everyone who is impacted by the AF problems to send your camera to a Nikon Service Point. 

The repair has some limitations though, there are still some sharpness variations, the significance depending on the lens.  

My D700 shows more consistent results with the same lenses at a 3x lower resolution, and gives me a better confidence that I can rely on it for consistent AF. It’s a matter of time to see if daily usage of my D800 gives me a similar enjoyable experience before drawing a definitive conclusion about it’s current status. 

D800 autofocus problem

1. Introduction

When I was making pictures with my brand new D800, I found out I got quite some mis-focused pictures compared to my other DSLR cameras (D70, D300, D700 and D7000). After a short investigation, and confirmed by reports on the web, it turns out that there are autofocus problems with the left field autofocus points with samples of the Nikon D800 and Nikon D4. In this post I’ll summarize my own experiences, and try to keep up with the latest insights in how Nikon will resolve the issue.


2. Observations

Simply put, if you make a picture using the optical viewfinder AND one of the left field focus points, the resulting picture is unsharp. The problem does not occur with any of the mid or right field focus points or when using live view for any of the focus points. The problem becomes better visible with wide-angle (<= 50mm) lenses, and when the object is at larger distances of a subject (> 1m).

I’ve made the problem visible by making several pictures of a bookshelf (made with a 24-70/2.8, in this specific case@24mm@f2.8 at about 1.4m distance, manual mode, 1/160, f2.8, autoISO, autoWB, JPG straight out of the camera). For these pictures the camera is fixed on a tripod at the same location, and only the AF point is changed. To get an idea where the middle, left-most and right-most focus points are situated, a full overview picture is shown below. 

 Lmr

The following excerpts show a 100% crop from the above picture showing the sharpness achieved for different auto focus points: 

MIDDLE auto focus point: 
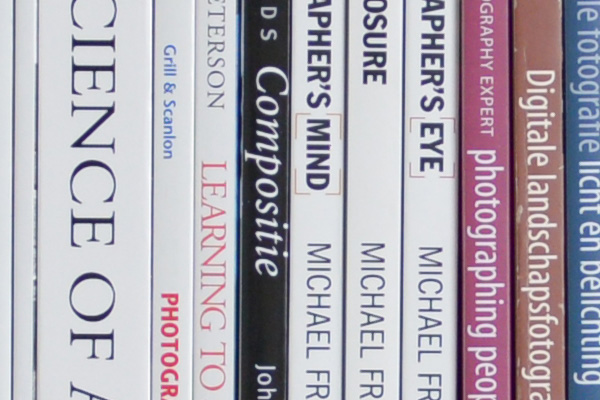
m

LEFTMOST (left_5) auto focus point: 

L5

RIGHTMOST (right_5) auto focus point: 
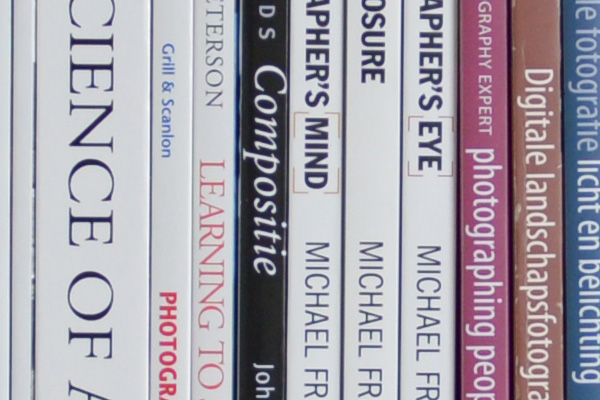
R5

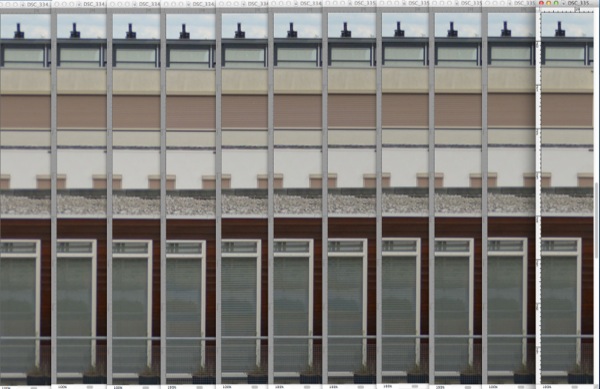
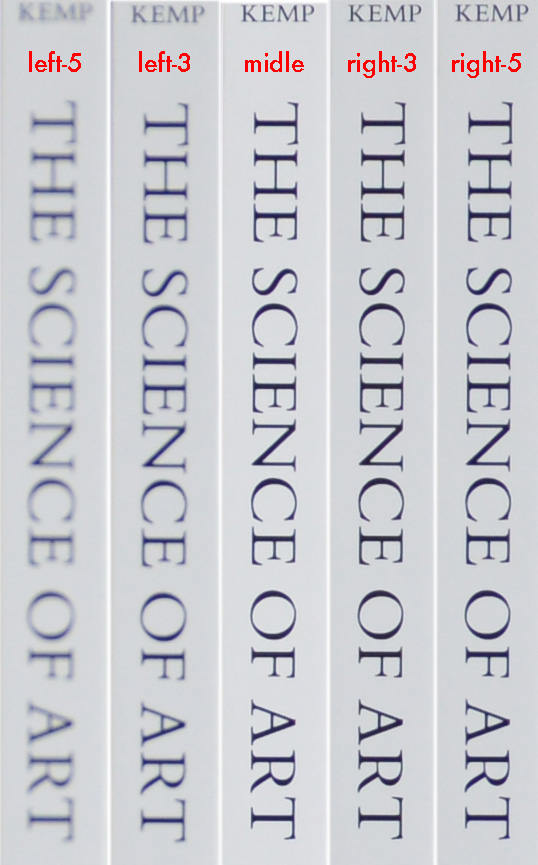
To give an idea how the sharpness changes when you move the focus point from left to right, see the assembled picture below. I’ve indicated the position of the focus point with the red text, where  number 5 is the focus point furthest away from the centre focus point. As you can see from the picture, the sharpness remains constant going from the middle to the right focus point, but gets worse when going further from the middle to the left (small differences in color temperature and brightness are because autoISO and autoWB were enabled; not relevant for the test). 
Lr

To exclude focus problems with the setting I’ve created, I’ve taken many different pictures by for instance turning the camera upside down (i.e. exchange the focus points), use different type of subjects, but unsharp pictures occur consistently when a left-field auto-focus points is chosen. 

When selecting the left-most focus point, and comparing it a picture made with live view selecting the same focus point (which for live view is typically somewhat larger!), you can clearly see that the live view picture has the expected sharpness, whereas the viewfinder based picture is unsharp at the point of focus. 
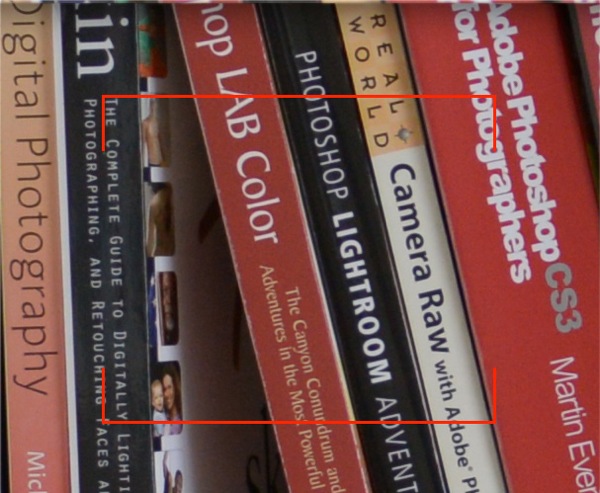
Left lifeview

Left viewfinder

The  left field AF points tend to focus to objects further away. The following two excerpts  show a part of the bookshelf with a book stored in the back (bookshelf about 50cm deep, camera about 2m away from the bookshelf). For the middle to right focus points this book looks blurry, for the left-most AF point the text on this book looks pretty sharp, whereas the part that should be in focus looks blurry. 

Midblur

Left sharp

This clearly points towards a problem with the focusing system on the left side using viewfinder-based autofocus. 


3. Analysis 


A. Contrast versus phase autofocus

The focus problem only reveals itself when using the optical viewfinder. Good and consistent results are accomplished using live view. 

Live view uses contrast detection auto-focus (CDAF). CDAF is based on the sensor directly, and is very precise. The disadvantage is that it is slow (not considering some latest innovations in the latest mirror less cameras), as all the data needs to be extracted from huge mega-pixel sensors.  

The optical viewfinder uses phase detection auto-focus (PDAF). PDAF uses a dedicated mechanism based on mirrors and a separate module (the CAM3500FX) to accomplish auto focus faster. It should however be optically aligned with the sensor, hence the assembly plus calibration of such a device is very important to obtain similar results as with CDAF. 
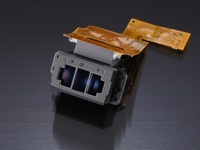
Multicam3500FX l

For more info see http://en.wikipedia.org/wiki/Autofocus, or even more details in Google Books, this article of Douglas Kerr, this extensive French wiki, a Korean article and French article with many nice pictures, and LensRental

Conclusion: the problem only occurs when focusing via the viewfinder. Live view results show that the trajectory from object to lens to sensor is fine, so we don’t have to question the test setup. The focus problems can be narrowed down to viewfinder focus. 


B. Lens

One hypothesis could be that the problem is lens-related. This is not the case because of the following reasons.

1. All my lenses focus correctly at all focus points when live view is used.

2. The problem occurs with multiple lenses (14-24mm/2.8, 50mm/1.4G, 24-70/2.8, 70-200/2.8). 

3. It would be highly unlikely that all of these lenses exhibit a problem only on the left side, and only on this camera. 

Conclusion: The problem is not lens related. 


C. AF fine tuning

Although the lens may not be the problem, optical variations may cause different behavior when using PDAF compared to CDAF. PDAF relies on a different optical path with different components to accomplish focus. If this path is not aligned and/or calibrated to the direct path from lens to sensor, it may calculate a wrong focus distance. 

Nikon offers a possibility to fine-tune this difference for each lens-camera combination. One can optimize the sharpness results by shifting the point of sharpness forward of backward. See Nikon’s recommendations on how (and when!) to do this. Because AF-fine tuning is applied by the same amount to all focus points, it is not possible to calibrate each focus point independently using the camera menus. Hence a focus mismatch in one region of the field cannot be solved by changing the AF-fine tuning. 

None of my lenses require AF-tuning to accomplish good or decent sharpness for the middle and right focus points (checked with a Spyder lenscal and double checked with other objects). 

Conclusion: The  AF focus problem is not related and cannot be solved by AF fine-tuning.   


D. Focus shift

When focusing using the viewfinder, the camera focuses with the largest aperture (lowest figure), and makes a picture with the selected aperture. E.g., in case of a f1.4 lens set at f2.8, the system focuses at 1.4, but makes the picture with 2.8. When using live view, the camera would use an aperture of 2.8 for the focusing. 

Light sensitive lenses (with an aperture of 1.4 to say 2.8) have a property called focus shift. This means that if you focus using a particular aperture, and you change the aperture without changing the focus, the point of sharpness changes (e.g. see dpreview). The reason for mentioning this, is that this may cause differences with live-view and viewfinder based pictures. This is  important for AF fine tuning, but also to diagnose the characteristics of the D800 focus problem properly (e.g. is it always front or back focusing?) .  

Although focus hunting may result in some inconsistent reporting, the D800 focus problem is not related to focus hunting. The focus results for the left and right point are different, where the left is unsharper. 

Conclusion: Always test sharpness with the largest aperture of a lens to avoid focus hunting. 


E. Field curvature

Some people mention field curvature as a potential problem. Field curvature is the effect that lenses tend to bend the image, hence a flat object in real life is not project completely flat on a sensor. This is expressed by the picture below. When you set your focus point to the middle, then the edges will become unsharp. If you would focus on the edges, the middle of the image becomes unsharp. Especially wide-angle lenses do have some (intrinsic) field curvature. 

When a lens that requires some AF-fine tuning is not fine-tuned, the effect of field curvature can be magnified in the outer focus points. Where the middle point is just about sharp, the edges become quite unsharp.  By AF-tuning the lens, the sharpness results can be improved overall. Nevertheless, fine-tuning the PDAF system to the CDAF system based on the centre focus point, and expecting ultimate sharpness for all possible use-cases (lens focal length, lens aperture, object distance, focus points) is virtually impossible. Hence some slight deviations in sharpness are to be expected and normal. 

Field Curvature LR

Although some reported tests on the web can be related to field curvature, the focus problem of the D800 is not related to field curvature. There are multiple reasons for that:

1. It would have the same effect when selecting a right focus point, which is not the case.  

2. The whole picture is unsharp when using the left focus point

3. The outer focus points for full-frame cameras are not situated at the boundaries of a lens, but between the middle and the boundary of a lens (at 25% and 75%). Lens tests (e.g. 24mm/1.4 or 24-70/2.8) show that at those positions the lens is almost as sharp as in the centre.
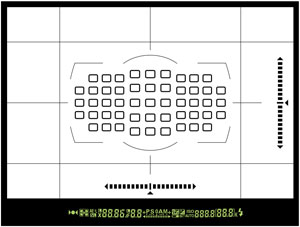
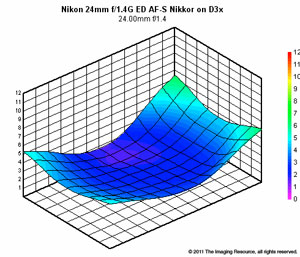
 Affields 24

Conclusion: Field curvature is not the cause for the unsharpness reported as the left-field AF problem.


F. Focus distance and focal length 

It seems that the focus problem is more obvious with wide angle lenses at larger distances from a subject. With my 85mm/1.4 at short distances, hardly any effect can be seen when selecting different focus points. Some people report good results with a 85mm/1.4G only, and claim their camera is OK, which is not a guarantee. 

I see focus problem with the 14-24/2.8, the 24-70/2.8 and the 50/1.4, and not or hardly with the 60/2.8 and 85/1.4 (although others report there is). I haven’t tested my other lenses yet (and I don’t intend to). 

Conclusion: The focus problem does not become obvious with every lens. 


G. Difference in focus points

The middle focus points are so-called cross-type focus points that are more (light)sensitive and accurate (detect both vertical and horizontal lines) than the other AF points. Some claimthat the AF problems are related to AF problems due to the smaller accuracy of the outer focus points. This does not explain why the problems only occur on the left side of the focus field.  

There have been reports that the problem only occurs when a single focus point is used. Therefore I’ve also tried multiple focus points, and other AF-modes (AF-S, AF-C), but the focus problems remain the same when only left-side focus points are used. 

Conclusion: The AF problem is not related to focus modes or focus point differences. 


H. Focus consistency

Auto focus is based on optical measurements, depending on optical, mechanical, electrical and mathematical principles. When focussing on a subject, small deviations may occur (see for instance this movie), and hence not every focus attempt will deliver guaranteed optimal sharpness. For that reason it makes sense to make multiple photos when testing AF performance.  

Conclusion: Make multiple pictures when checking focus performance. Also try different angles and distances to see if this impacts the results. 


I. Subject quality in terms of focus accuracy

Some objects are difficult to auto-focus. In general, CDAF gives better and more accurate results than PDAF. When testing a camera-lens setup, it is important to have good contrasty and/or texture rich subjects. When a camera has difficulties with auto focus, in most cases the lens start to hunt for focus (go hence and forth). In such a situation, focus results can be off. In  case of the bookshelf I use for my tests, or a lenscal, I obtain consistent and good results. I also turned around the camera upside-down to exclude potential focus problems with books on one side. In each experiment the left-field AF points give me unsharp results, all other AF points give me sharp results. 

Conclusion: The subject quality is sufficient to detect the auto focus problem with the D800. 


J. High Resolution

Some say it is “logical” that a camera with so many pixels is more sensitive to sharpness. Although the claim is certainly true, sharp results can be accomplished with live view and the middle/right focus points, so resolution is not a problem here. Furthermore, the sharpness issues can seen very easily when looking at the results at say 25% zoom rate, which would equal a 2.25 MPix camera at 100% scale:


M25  L25

Conclusion: The AF problems are visible at lower resolution than the full 36MPix density, and are not related to the high pixel density of the D800 (or D4 which exhibits the same problem). 


K. Camera movement

To avoid any movement during picture taking, the mirror up mode of release delay (e.g. see dpreview) should be used, and the camera should be on a tripod. Nevertheless, the AF problem is so significant that it can be easily shown when taking pictures out of the hand. 


L. Other cameras

I’ve also performed the same tests using my D700, (based on the same CAM3500FX module for PDAF focusing), and it shows consistent behavior over all focus points. There is no substantial difference in sharpness. 


M. Tilted assembly

One hypothesis is that the problem is caused by a tilted assembly of the CAM3500FX module, or one of the mirrors. This is quite hard to understand knowing that the right side focus points yield good results, and the focus principle is based on a symmetrical differential setup. 


N. Firmware

Another hypothesis is that the problem is caused by a firmware error. This is hard to understand knowing there are cameras with no problem. 


O. Calibration error

Another hypothesis is that the live view optical path is calibrated during manufacturing, and an erroneous procedure (or no procedure?) was in place in one of these plants. In that case, cameras need to be send back to Nikon Service for re-calibration when they have the right means in place. 


4. Towards a solution

My camera has been fully repaired now. It took a couple of iterations, in close cooperation with Nikon Service Points the Netherlands to repair the camera. See the following posts here:


Appendix – More info on the web

The left-field AF focus problem has been mentioned on the web already many times. Here is a list of some links.

Some other interesting stuff:

For the die-hard, some patents:


Appendix 2 – Dust

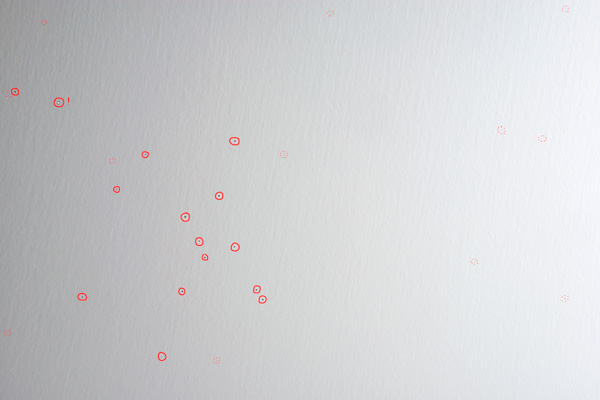
Unfortunately I also seem to have quite some dust on my sensor. I’ve tried to remove the dust using a dust blower (repeated a couple of times), I got rid of a few, got 2 in return, but most particles seem to be sticky and dot go away. I’ve changed lenses maybe about 4 or 5 times in a very controlled manner to avoid dust, so given the amount of dust and the stickiness I would expect them to be present out-of-the-box. Hence, sensor cleaning seems to be another reason to send in the camera for service! 

Underneath you’ll find an overview picture, and two excerpts at 100%. 
Dust

D2

D3


Nikon V1

Introduction

This post is about a luxury problem. Being an owner of a Nikon D70, a D700, and a D7000 (logarithmic ownership), together with the golden lens trio (14-24, 24-70 and 70-200) and some beautiful primes (50, 60, 85), there is still a wish for more… Smaller and lighter. Especially on family trips, on holidays, and photographic tours where ultimate image quality is not of ultimate importance.
I tried to work this out in with a P&S, first a Fuji Finepix F40d, too noisy), and then a Canon S90 (quite OK). In bright sunlight both do a good job, but they become noisy in common environment, like in-house. So these cameras are perfectly capable for bringing home some memories, but it is hard for me to use them for creative photography (which probably tells more about myself). Framing a picture by means of an LCD doesn’t seem to work for me. In most cases overall disappointment is the result when I come back shooting with these P&S cameras.

So, with the recent announcement of the Nikon V1, I thought it was worthwhile to have a look on the web and a travel along the local photography shop to look at various system cameras, and to get an idea whether the V1 is good value for money.


First Impressions

The 3 cameras that appealed most to me were:

Nikon V1 – It looks cute, and has a marvelous viewfinder! The grip is a bit slippery though, it has not build-in flash, and it is not easy to switch modes without going into the menu. From usage point of view (small + viewfinder) this has my preference.

Olympus PEN-EP-3 – Good grip, good photo quality. No viewfinder, and the user interface is reported to be cumbersome. It can be extended with a viewfinder, so if its photographic qualities are better, it may make more sense to go for an Olympus than a V1.

Panasonic GF3 – Same situation as the Oly3, however a cheaper feel (also price!). The GX1 is probably a good alternative, but hardly available. The G3, which has a viewfinder, is too big in my opinion.

There is of course other interesting stuff on the market. Take the Fuji X100, great retro-look, good quality APS-C sensor, and even a view finder, but it is big, pretty heavy, and limited to 24mm only. The Fuji X10 seems to address some of this, but it has a very small sensor, so it comes close to the Canon S90 in terms of quality, and its view finder is reported to be average. The Sony NEX3/5 will offer the best quality sensor at a competitive price, but the lenses are too big for my purpose, and they have no view finder. The Sony NEX7 has a view finder, but is rather expensive, and again lenses are big. In that case, the Nikon D7000 is a better alternative with the body being a better counter weight to the lenses. The same holds for the Samsung NX200, the APS-C sensor requires relative big lenses.


Size

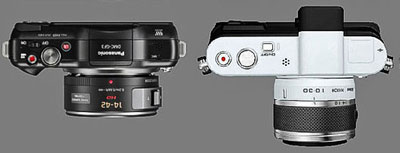
As you can see, the V1 is the highest, the EP3 the widest, the GF3 the smallest (see camera size). The Nikon J1 (which is a V1 without view finder) would be a more fair comparison, and would be the smallest of the three.

Threesmall

With the new 14-42 standard zoom the Panasonic shows a size advantage. Hence, the small CX sensor of Nikon hasn’t brought a significant advantage in lens size yet.

Pn

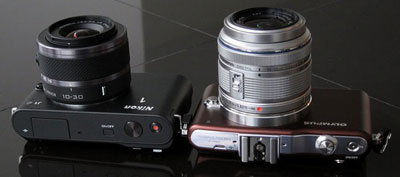
A comparison between the J1 and a smaller Olympus EP-3L shows that the Olympus 14-42 standard zoom is a bit bigger:

On

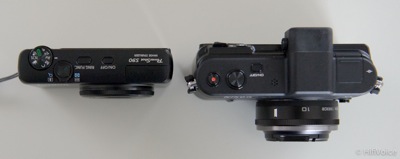
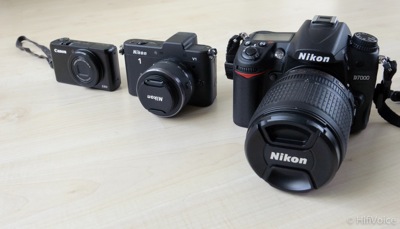
Overall I would conclude that the size differences are there, but not significant. In any case, the above cameras typically don’t fit your pocket, and need a small bag. For cameras that can be carried in your pocket, you’ll need a P&S. For instance, the Canon S90 including lens equals the size of the V1 body only.

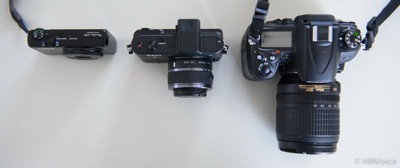
DSC 8591

There is definitely a size advantage compared to an SLR, see for instance the comparison to a Nikon D7000:

DSC 8575

DSC 8620


Handling

The Olympus EP3 has a good firm grip. The Panasonic GF3 feels small and cheap. The Nikon has no good grip on its front. The price for a dedicated Nikon grip on the V1 is ridiculous (> $/€100 for a piece of plastic/rubber with a screw that should be included standard for this price setting anyway…). A glue-able alternative is available at flipbac, or at kleptography (for the J1).

Most of these cameras are made with P&S in mind, and hence should be easy to use for everyone out-of-the-box. This is certainly the case for the V1, you set the language, date and time, and off you go! Nikon restricted control of the camera by means of buttons or wheels, e.g. there is no PASM dial on the V1, you have to enter the menu for those. Manual focus also requires a lot of clicking.

The menu structure of the EP3 seems to be complex and cumbersome. When looking at EP3 pictures on the web, all of them seem to have a magenta cast which requires manual interference to white balance them correctly.

The GF3 has almost no dials and buttons, and will be mostly menu driven. The new GX1 does have more dials and buttons.


Sensor Quality

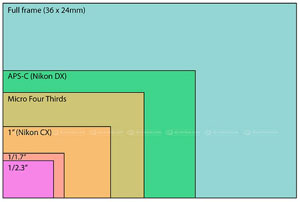
The Nikon is uses a 10 Mpix CX-sized sensor (116mm^2, pixel pitch 3.4um) from Aptina. The Olympus and Panasonic use a 12 Mpix sensor (225mm^2, pixel pitch 4.2um). Although the 4/3 sensor is almost twice as big as the CX sensor, the pixel pitch is only 33% higher.

Sensorsizes

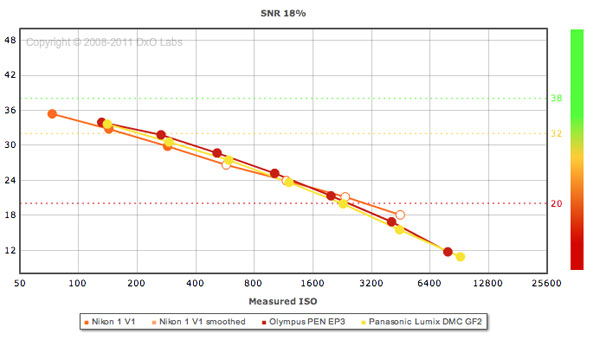
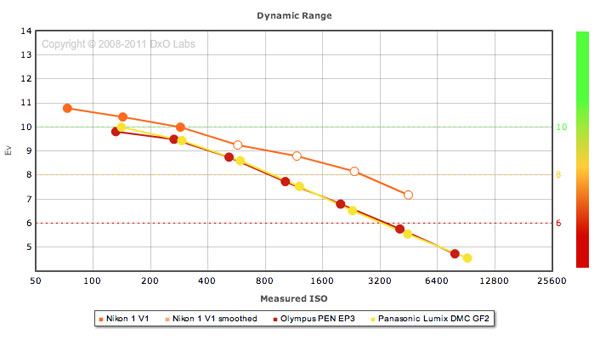
DXOmark reports the intrinsic sensor performance, and excludes differences due to in-camera processing. The GF3 is not reported, but because the GF2 contains the same sensor I took those figures. As you can see that despite the smaller sensor in the V1, the sensor quality is the same when appropriate processing is applied. So, with the right processing the V1 can achieve the same or better results as the micro-4/3s. Don’t let yourself being fooled by the tests on the web that show blurry or noisy pictures on the web. You’re looking at differences in (in-camera or RAW) processing, and not at the intrinsic possibilities of the sensor!

Nop

Some graphs are shown below (see DXOmark for a flash version – did I say iPad?). Basically these are all overlapping, besides the dynamic range of the V1 being somewhat better. Quite surprising to get these results out of such a small sensor, and definitely a good result.

Snr

Dynra

If a system camera is going to be your only camera, and sensor quality is of big concern for tough situations, the Sony NEX has a clear advantage (77/23.6/12.7/1079). In my specific case, having a Nikon D700 (80/23.5/12.2/2303) or a D7000 (80/23.5/13.9/1167) at hand makes absolute sensor quality less important, there is always a backup. Besides, it is not only the sensor that matters, a system is as weak as its weakest component, so the lenses are as important as well. And this is a situation where Sony is not so very strong as can be seen in the next section…

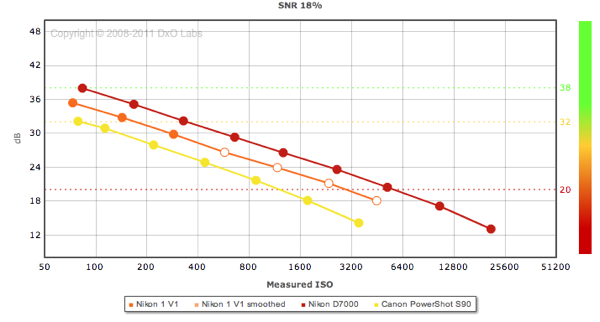
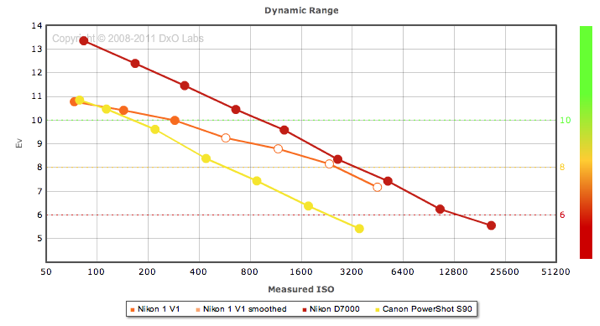
In line with the size comparison, we see that the Canon S90 – Nikon V1 – Nikon D7000 have one stop advantage noise wise. The main advantage of the V1 is the Dynamic Range that is preserved better in higher ISO levels.

Screen Shot 2011 12 03 at 10 54 44 AM

Screen Shot 2011 12 03 at 10 54 54 AM

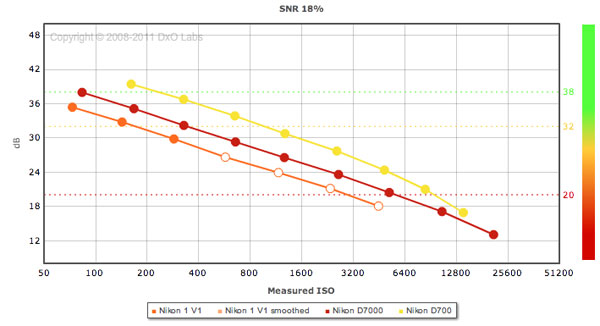
Last but not least, the SNR graph to compare the V1 to the D700 and D7000. As you can see, it is about 1 stop away from the D7000, and 3 stops away from the D700 in terms of noise. When compared to a D70 or D200, it is comparable or a maximum of 1 stop off. That’s what I would call innovation, almost SLR performance of 7 years ago in a small body!

Snr700


Lens Quality

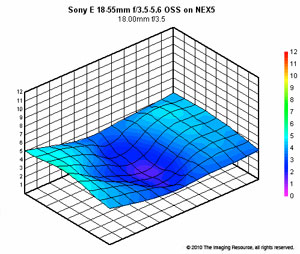
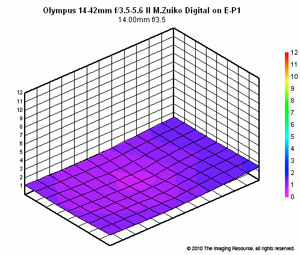
No matter how good a sensor is, a bad lens will never provide sufficient sharpness, contrast and texture. Look at for instance the Sony 18-55mm (effectively 27-83.5mm) and the Olympus 14-42 (effectively 28-84mm) measured by slrgear. Although the Sony has a better APS-C sized sensor, the lens of the Olympus outperforms the lens of the Sony. Although in general more noisy, the Olympus pictures are more crisp and appealing in real life situations.

SzOz

Also the Panasonic lenses show good results, though in general less good than Olympus. Some excellent lenses in the 4/3 camp are the Olympus 12mm/2.0 (€749, very expensive), the Olympus 45mm/1.8 (€299) (look how incredible it is here), and the Panasonic 20mm/1.7 (€349)

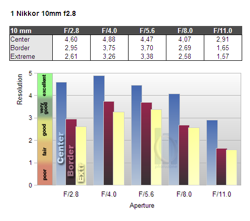
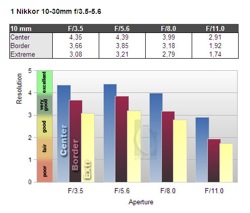
There are no slrgear tests of the Nikon lenses reported yet. There are some measurements reported on photozone and dxomark, but none of them can be compared to the 4/3rd lens measurements.  There are also some private tests on dpreview. Below are the measurements of the Nikon 10mm/2.8 and the Nikon 10-30mm/3.5-5.6 of photo zone (NEW: Nikon 30-110mm, and a nice comparison of these lenses at Mansurovs):

Mtf 10 3010

Nikon announced the development of more lenses in the future (see here). There is also a convertor, to attach Nikon AF-S lenses (see a test at Rob Galbraith)


Image Comparisons

On the web cameras are rated based on comparing images of a given object. Although these tests are valid on themselves, absolute ratings based on these tests can give a wrong view of the possibilities of a camera. It depends largely on the settings inside the camera, and how you utilize the camera features.

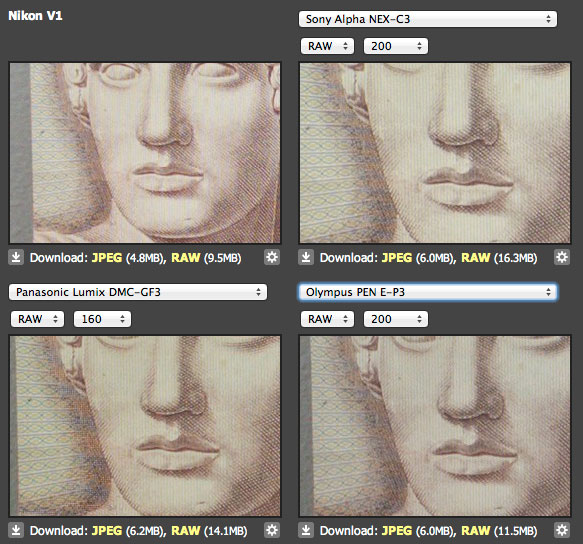
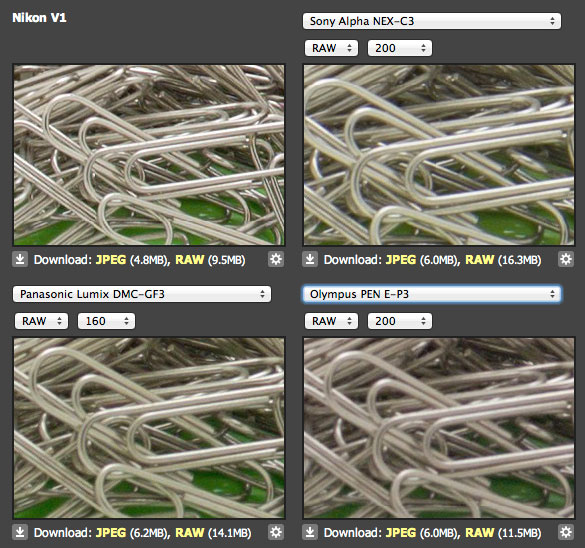
As an example, I’d like to show the comparison images shown on dpreview and imaging-resource. On dpreview you can see that the point of sharpness is different from all other cameras. In some parts of the scene the V1 is clearly less sharp, in other areas is looks sharper than all other cameras. You can see confusion occurring in blogs, where people refer to just a part of the scene, and make absolute statements about sharpness. Depending on the selected part, the outcome favors one camera above the other, giving an inconsistent view. Furthermore, for the Olympus a prime lens is used, for the V1 a zoom lens. Creating such differences in a test like this make it difficult to draw general discussion.

Face

Clips

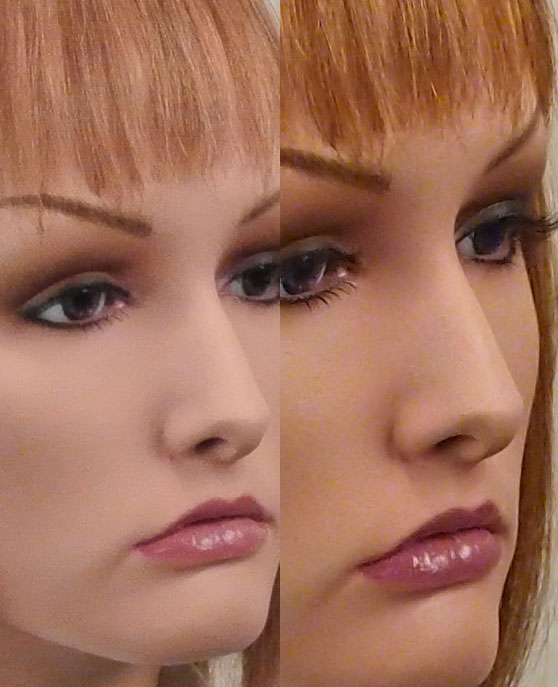
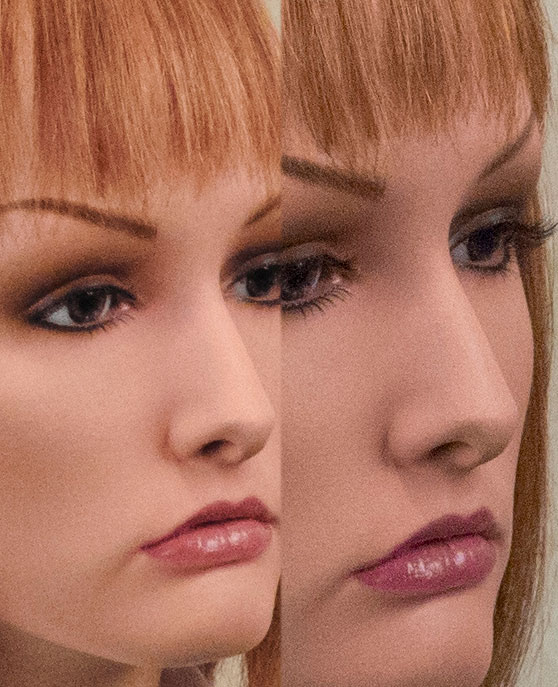
Even more extreme is the comparison on imaging-resource. The Nikon V1 picture @ISO1600 in the comparison looked so bad, that I considered viewfinder and handling of the V1 not enough good reasons to prefer it above an Olympus EP3. However, when investigating the root cause for the unsharp image (default noise reduction of V1 very aggressive, point of sharpness different e.g. look at the watch), and the difference in brightness (Olympus uses more contrast, the setup of the doll and light is different for both pictures) the outcome became different:

JPG comparison:

Jpg comp

RAW comparison:

Raw comp

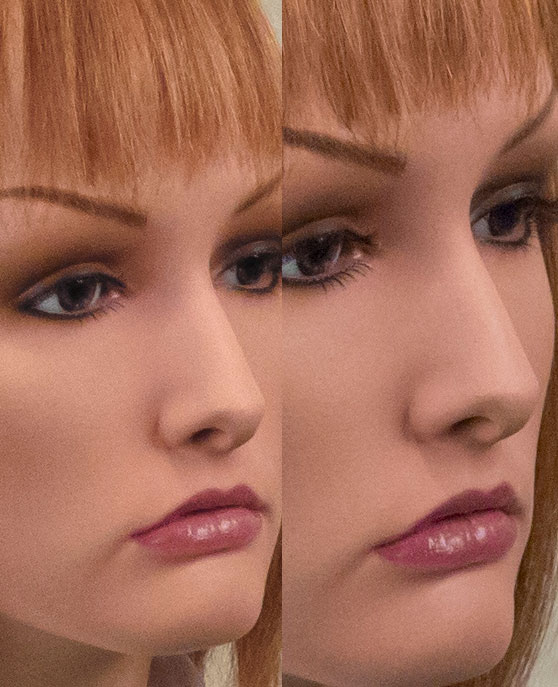
RAW after a bit of post processing (noise reduction, contrast & brightness) for both:

RAWafterPP

Essentially, it shows that intrinsically both cameras are equal in terms of reachable image quality.

All of this explains why I prefer the tests of DxOmark, as it measures the intrinsic sensor performance excluding internal camera processing, and gives a better idea of what you can accomplish by applying some post processing.

Last but not least, I did some comparisons with my own cameras. The results are default processed RAWs out-of-the camera, all at ISO1600, taken on a tripod. The full picture is shown below:

Foto

The excerpts are

Canon S90: 
S90

Nikon D70:
D70

Nikon V1:
V1

Nikon D7000:
D7000

Nikon D700:
D700

As you can see, if out-of-the-camera noise is your main concern, buy a Nikon D700.

The V1 noise is easy to reduce using post processing (pixel peeping):

V1 afterNR


Real-life experiences and Pictures

Tests at the site of Steve Huff and Mansurovs show the capabilities of the camera in the field. See some of their pictures that show the potential of the V1 in the hands of a good photographer:

Steve Huff:

bestb-680x455.jpg

Mansurovs: 
Nikon-1-V1-Image-Sample-3-650x434.jpg

My own stuff (all ISO3200, 1/10s, applied little noise reduction and 70s-style):
DSC_0195.jpg

DSC_0212.jpg


Further Reading

Take a look at the following pages to form your own opinion (M = measurements, C = comparison pictures, E = example pictures)

– DXOmark (M)

– Photoreview Australia (M)

– Imaging Resource J1 (M, C, E, see also V1 preview)

– Techriot (M, E)

– ColorFoto (C, M)

– Focus Numerique (M)

– Techradar (M, E)

– Steve Huff (E, C)

– Mansurovs (E, C)

– DPreview (E, C)

– Camera Labs (C, E)

– CameraGearGuide (C) + images (E) + advice

– PhotographyBlog (C, E)

– Digitalcamerainfo (C, E, also see V1 preview)

– Fotomagazin Test Images (C)

Nikon Rumors (C, E, comparison with EP-3)

– FotoVideo (C)

– Les Numeriques (C)

– OpenBloom (E)

Thom Hogan

– Visual Science Lab (E)

– CNET (E)

– Pocketlint (E)

– Rob Galbraith (E)

– ePhotozine (E, also comparison between EP3, GF3 and NEX5)

– Discerning Photographer

– Tweakers (+ comparison with Sony, Olympus and Panasonic)

– Zoom

– Nikon V1 page


Conclusions

My opinion is that the Nikon V1 is capable of making good quality pictures. If you want ultimate sharpness, a lot of resolution, or noise-free pictures out-of-the camera, stick to a full-framed SLR with some good prime lenses. If you want a camera that you can easily take anywhere you want, buy a Nikon V1 (or another brand), and have fun! I see this opinion is shared by those who take the camera out of the lab, and in to the field, they are happily surprised about its performance.

+ Very nice viewfinder.

+ Easy operation, nice handling.

+ Good quality pictures.

– Bad grip.

– High price.

– Very high prices for accessories.

The Olympus has a small resolution advantage, and currently better lenses in its portfolio. It is to be seen what Nikon (and others) will bring in the near future. I however prefer the viewfinder of the V1, and assume Nikon (and others) will surprise us with nice lenses in the near future.